Please note: if you click product links in this article, FigCommons.com may earn a commission on purchases you make. Learn more by reading our disclosure.
There are many ways to propagate a fig tree — air layering, ground layering, tissue culture, grafting, the list goes on — but the simplest and most common method, especially for beginners, is to root from cuttings. As such, knowing how to take cuttings the right way is a critical skill that will set you up for success when propagating this fun-to-grow fruit. This article takes a deep dive into the best time of year to take fig cuttings, the nuts and bolts of just how to complete the task, and how to store any extra cuttings you find yourself with. Following this guide will leave you with the raw material needed to successfully propagate new fig trees from cuttings, a process that we’ll detail in a separate article in the near future.
When is the best time of year to take fig cuttings?
The ideal time to take fig cuttings depends on whether the tree is potted or in-ground.
For in-ground fig trees, the best time to harvest cuttings is in late fall/early winter, after tree goes dormant but before any serious cold hits. This is because dormant wood roots more successfully than active wood, but a freeze can kill the buds that will later become leaves on the new cuttings. With in-ground trees, you’re seeking a balance between these two factors. Note that taking early winter cuttings means you’ll have to store them — see below for a how-to on storing fig cuttings. If you choose to start rooting them right away, you’ll most likely have to keep the young fig trees alive under grow lights until winter passes.
For potted fig trees that spend the winter protected from freezes in your basement or garage, cuttings are best taken just before the tree wakes up in spring. This is because cuttings that are about to wake up are full of vigor and ready to root, and the overwinter protection means their leaf buds won’t have been killed by a freeze during the cold season. Taking cuttings in early spring has an additional major benefit: you can get them rooting right away and not have to worry about keeping them alive under lights because of low outdoor temperatures. Winter will be behind you by the time they are well-rooted and leafing out.
Where and how to make the cuts on dormant wood
The where and how your dormant fig wood cuttings are taken will be the same regardless of whether you’re working with early winter cuttings from outdoor trees or early spring cuttings from potted ones.
First, you need to identify the best branches for eventual rooting success. The most successful cuttings come from newly lignified parts of the tree that are wider than a pencil. In other words, you’re looking for wood that turned brown in the most recent season (or at maximum two seasons ago), as opposed to wood that is several seasons old. The reason for this is that newly lignified cuttings are full of vigor and will root more readily than very new or very old fig wood, and cuttings that are thinner than a pencil are highly susceptible to rot.
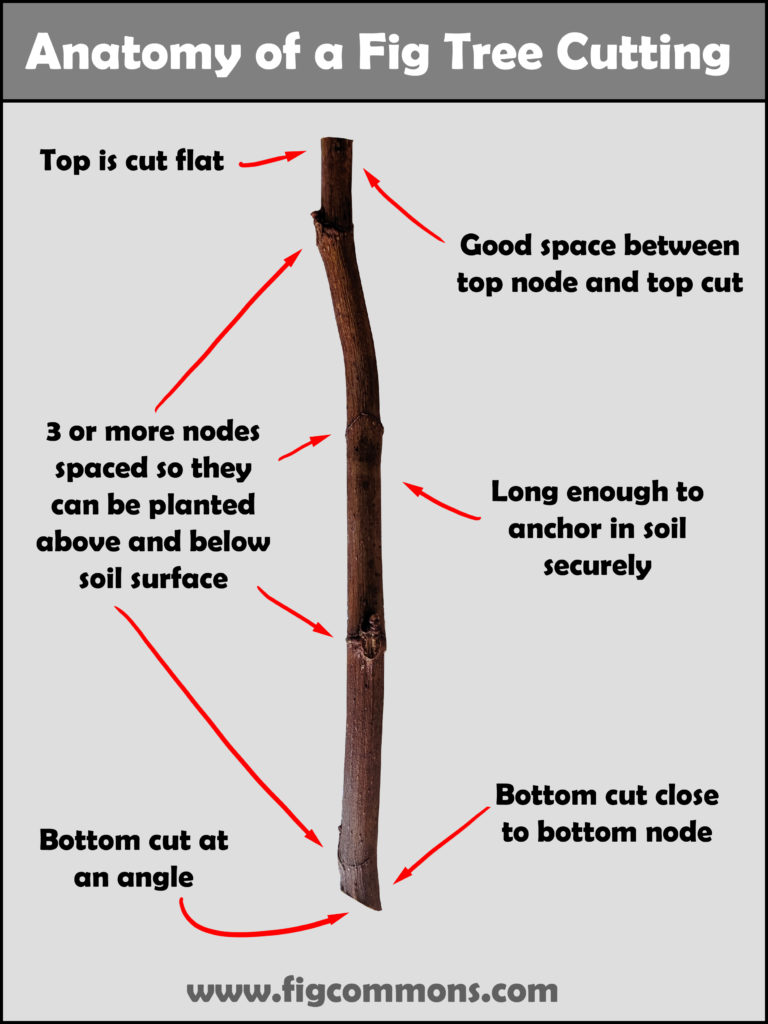
Now that you’ve selected a good branch you don’t just start hacking away. Instead, you should inspect the branch to plan out where best to make your cuts. Although the most critical guideline is that each cutting should have at least 3 nodes, you also need to make sure the cuttings are long enough to get nodes both above and below the soil line. Additionally, the deeper you’re able to bury the branch in its rooting media, the more stable it will be. All of this means that you may need to take a cuttings with more than 3 nodes if the nodes are very closely spaced together — about a foot in length is ideal if you aren’t needing to maximize the number of cuttings you’re taking, but you can go shorter if you need to as long as the following requirements are met:
- Brown — not green — but still relatively young (one or two seasons old max)
- Wider than a pencil
- Have at least three nodes, but more is better
- Are long enough to anchor securely when planted in rooting media
- Are long enough to have nodes solidly above and below the soil line
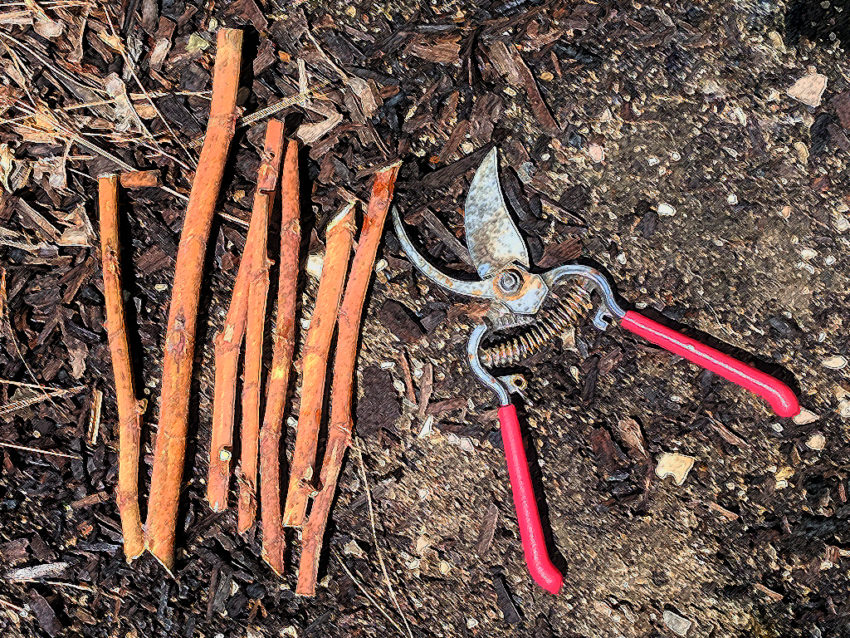
Now, the moment of truth: having planned out where your cuts will be made, it’s time to break out a clean, sharp set of pruning shears and actually take those cuttings. To prep your shears you can clean them by soaking in a solution of 10% bleach/90% water for a minute or two, and sharpen them as needed with a sharpener such as this.
Once your pruning shears are ready, go ahead and make your cuts! You should cut the bottom of each cutting at an angle and the top flat across, since this lets you later identify which end is up (it can actually get confusing on some cuttings when they’ve been separated from the tree. Additionally, you should cut the top as far above the highest node as possible, and conversely, the bottom just under the lowest node. It’s done this way because the top is more susceptible to drying out than the bottom (which will eventually be embedded in moist soil), so having some buffer wood above the top node helps keep it from desiccating. Of course this rule doesn’t apply if you are taking a cutting that has a bud on the tip.

Taking fig tree cuttings in summer
As mentioned above, the dormant season is universally regarded as the best time to take fig tree cuttings. Rooting green fig cuttings can be very difficult because they tend to rot or mold before sprouting. They can definitely be rooted successfully, but require more care and attention than lignified cuttings do. You must watch softwood summer cuttings closely, constantly monitoring their moisture levels, always keeping the temperature right, regularly circulating the air in their environment, and promptly disposing of cuttings that are not doing well. Because of this, if you’re going to take fig tree cuttings in summer it’s critical you do it correctly in order to maximize your chances for success.
The guidelines for taking green fig cuttings are as follows:
- Summer cuttings should have at least three nodes, but more is better.
- After taking a cutting, remove all but one or two leaves since the branch will not be able to support or utilize a full load of leaves after being separated from the parent tree.
- Your rooting efforts will be much more successful if you’re able to prune the branch in a way that leaves some brown lignified wood at the bottom of the cutting, rather than taking a wood that is soft and green from bottom to top. The idea is that rot is most likely to occur on the part of a cutting that is under the soil or water line (depending on rooting method), so you’ll see more success if that part is older lignified wood.
Rooting the summer cuttings is a topic unto itself which I’ll be covering in a separate article in the near future.
How to store fig tree cuttings
If you’ll be storing your cuttings for more than a few days it is a good idea to disinfect them and seal the cut ends. Disinfection helps discourage mold, and sealing the ends helps keep the cutting from drying out while preventing pathogens or mold spores from entering it. Sure, it takes a bit of time and effort, but you avoid the disappointment of pulling cuttings out of your fridge a few months later only to find them shriveled or rotten. Note that green cuttings don’t store well. You should only be storing cuttings that were taken during the dormant season.
- Label the cutting. This is important. If you have multiple types of fig tree be sure to label each cutting right away! This prevents the extremely common issue of forgetting or mixing up the variety. The quickest, easiest, and most reliable method is to write variety names directly on cuttings using a paint marker whose color contrasts with the brown cutting. Trust me, you’ll thank me for this someday.
- Disinfect your cuttings. To disinfect, soak the cuttings in a bath of 3% hydrogen peroxide (this is the typical over-the-counter dilution). If you don’t have hydrogen peroxide on hand, you can use a 10% bleach/90% water solution. Wearing gloves, scrub off any dirt or debris using a soft toothbrush. Leave the cuttings in the bath for 2 or 3 minutes, then remove and air dry. You don’t need to rinse off the bleach or hydrogen peroxide.
- Seal the cut ends of your cuttings. If you’re just sealing a couple of cuttings, Liquid Electrical Tape is a great option because you can open it, slap it on, then close the container. While great for a few cuttings, liquid electrical tape can be time consuming and sloppy to use on a large number of cuttings. If you’re sealing a lot of fig cuttings, you can melt beeswax in a high quality disposable pie tin on your stovetop (be careful, the melting temperature of beeswax is low!), quickly dipping each cut end into the wax in order to seal it. If you’re working away from your stovetop, a sterno provides enough heat to melt the beeswax. You can seal a ton of cuttings very quickly using this method. You do not need to seal the ends of a cutting that have a bud on them (aka terminal ends or apical buds) since they don’t dry out the way cut ends do.
- Pack the cuttings for storage. The absolute best way to store fig cuttings is with a vacuum sealer, although this can be pricey if you don’t already have one. If you have a vacuum sealer, just wrap the cuttings you wish to store in a paper towel, slip them into the vacuum sealer bag, and suck out the air. If you don’t have a vacuum sealer, you can wrap the cuttings in a paper towel, place them in a freezer bag, then press out as much air as you can before sealing the bag.
- Store the cuttings in your fridge. Dormant cuttings can be stored in the cool environment of a refrigerator for months, since they continue to slumber as if it’s still winter.

